Selamat Belajar
saya minta maaf jika dalam tutorial ini isisnya kurang memuaskan.silahkan mencoment jika ada yang salah dan jika ada request tentang tutor laen,,thanks udah berkunjung..
trims
saya minta maaf jika dalam tutorial ini isisnya kurang memuaskan.silahkan mencoment jika ada yang salah dan jika ada request tentang tutor laen,,thanks udah berkunjung..

Sip Dah
saya minta maaf jika dalam tutorial ini isisnya kurang memuaskan.silahkan mencoment jika ada yang salah dan jika ada request tentang tutor laen,,thanks udah berkunjung..
Wednesday, February 23, 2011
Make a High Pass Photoshop Action for Epic Photographs
Posted by kan9mas on 9:42 AM
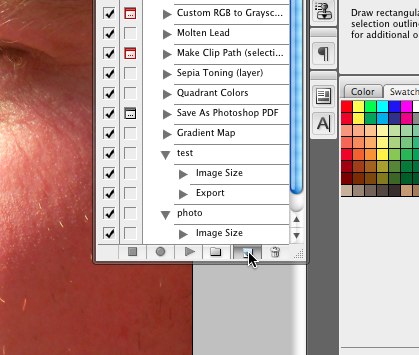
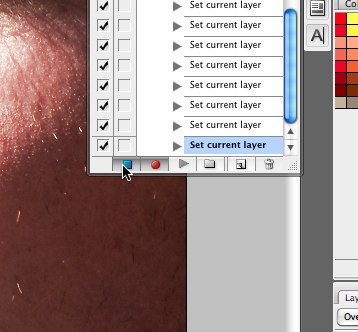
With your photo open in photoshop, open the Actions Menu (Windows>Action). Click the “Create New Action” Button.
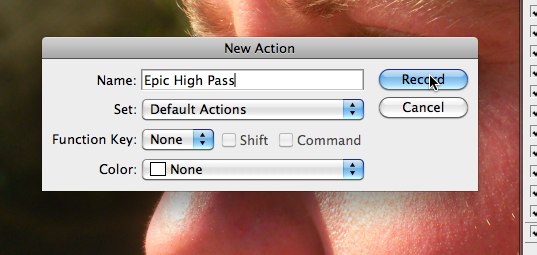
Name Your Action and Click Record.
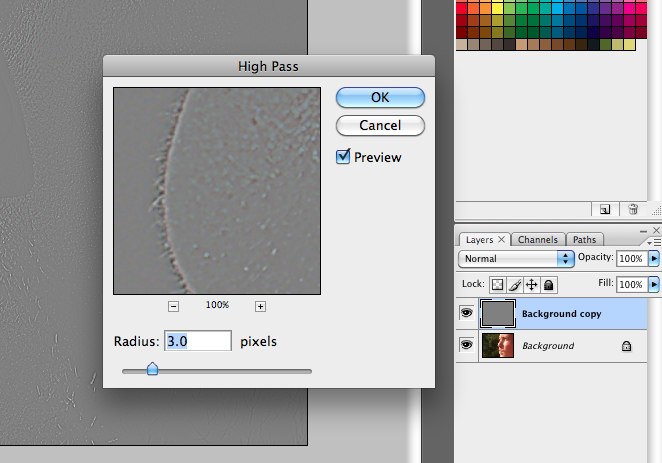
Duplicate The Background Layer. On the top layer apply the High Pass filter (Filter>Other>High Pass). Set the radius to 3.0 pixels.
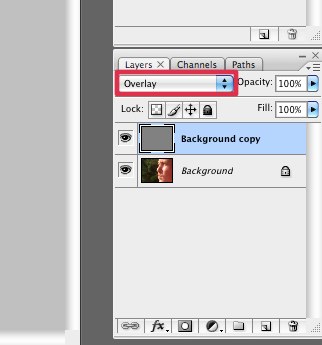
Set the top layer’s blending mode to Overlay.
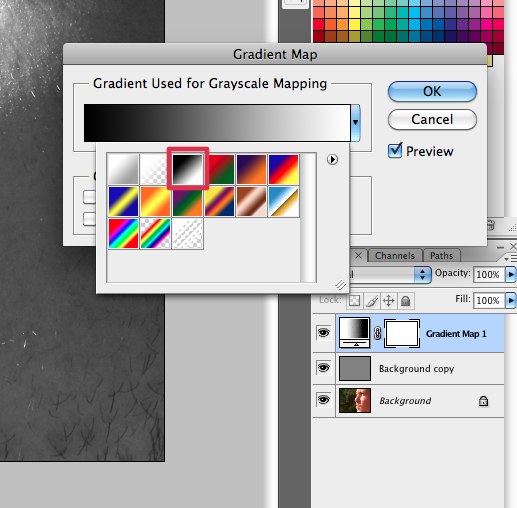
Create a new Gradient Map Adjustment Layer (Layer>New Adjustment Layer>Gradient Map). Set the Gradient to Black, White as seen below.
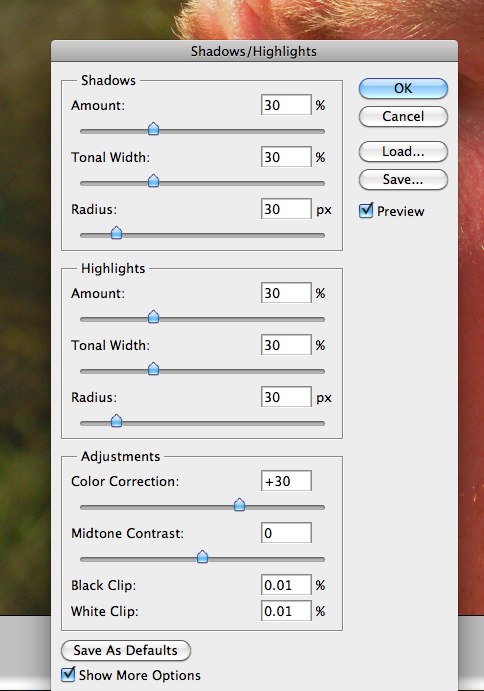
Duplicate the Background Layer one more time and move it to the top of the layer stack. With the top layer selected, choose Image>Adjustment>Shadow/Highlight and make the following adjustments.
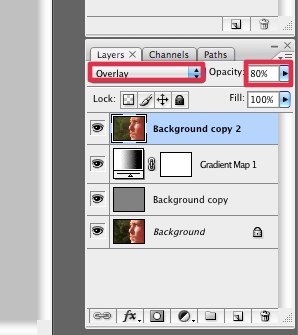
Finally, set the blending mode of this layer to Overlay and adjust the opacity to 80%.
Open the Actions menu again and hit “Stop” to complete the action.
Now you have one-click action to add some epic drama to any of your photos.
Sunday, February 13, 2011
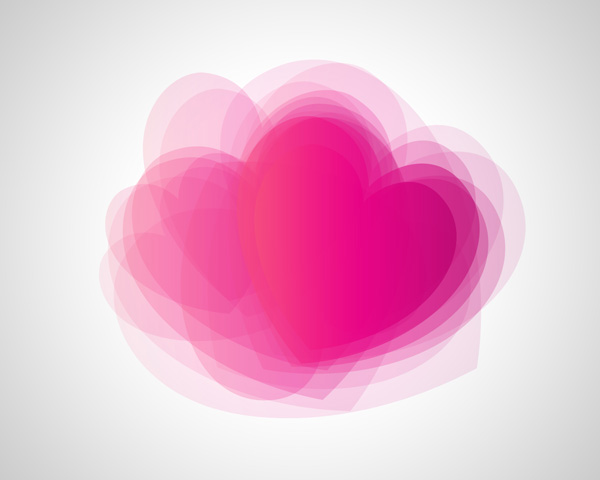
create abstract Valentine’s Day illustration with hearts in Photoshop CS5
Posted by kan9mas on 7:03 AM
Belajar Photoshop
Start working by creating a new document (Ctrl+N) in Adobe Photoshop CS5 with the size 1280px by 1024px (RGB color mode) at a resolution of 72 pixels/inch. Select the background layer in Layers panel and click on Add a layer style icon from bottom part of the Layers panel to select Gradient Overlay.

Click in the color bar to open the Gradient Editor and set the color stops as shown. Click OK to close the Gradient Editor dialog box.

We’ve got the next result:

Select the Custom Shape Tool (U)in the Tools bar, in the Options bar click the Shape to open the selection menu. Find Heart at the bottom of the menu, and then double-click a shape thumbnail to select it.

Click and drag to draw the heart shape. Then apply the Convert Point Tool to make the appropriate corrections on the heart’s shape.

Set Opacity to 10% for this layer and click on Add a layer style icon from bottom part of the Layers panel to select Gradient Overlay.

Click in the color bar to open the Gradient Editor and set the color stops as shown. Click OK to close the Gradient Editor dialog box.

We’ve got the next result:

Next we have to make some copies of the last made layer, increasing the Opacity value for each next copy and change the heart sizes with Free Transform (Ctrl+T) command.

Change the Opacity to 15% for the next copy:

Opacity is 10% for the next copy:

The next copy with Opacity to 10%.

Change the Opacity to 10% for the next copy:

This way we have to represent several copies as shown (Opacity - 10%).

The next copy has Opacity - 20%:

Also we have to represent several copies as shown with Opacity - 20%.

The next copy needs the Opacity - 30%:

One more heart with Opacity - 50%.

Next copy with Opacity - 70%.

Start working by creating a new document (Ctrl+N) in Adobe Photoshop CS5 with the size 1280px by 1024px (RGB color mode) at a resolution of 72 pixels/inch. Select the background layer in Layers panel and click on Add a layer style icon from bottom part of the Layers panel to select Gradient Overlay.

Click in the color bar to open the Gradient Editor and set the color stops as shown. Click OK to close the Gradient Editor dialog box.

We’ve got the next result:

Select the Custom Shape Tool (U)in the Tools bar, in the Options bar click the Shape to open the selection menu. Find Heart at the bottom of the menu, and then double-click a shape thumbnail to select it.

Click and drag to draw the heart shape. Then apply the Convert Point Tool to make the appropriate corrections on the heart’s shape.

Set Opacity to 10% for this layer and click on Add a layer style icon from bottom part of the Layers panel to select Gradient Overlay.

Click in the color bar to open the Gradient Editor and set the color stops as shown. Click OK to close the Gradient Editor dialog box.

We’ve got the next result:

Next we have to make some copies of the last made layer, increasing the Opacity value for each next copy and change the heart sizes with Free Transform (Ctrl+T) command.

Change the Opacity to 15% for the next copy:

Opacity is 10% for the next copy:

The next copy with Opacity to 10%.

Change the Opacity to 10% for the next copy:

This way we have to represent several copies as shown (Opacity - 10%).

The next copy has Opacity - 20%:

Also we have to represent several copies as shown with Opacity - 20%.

The next copy needs the Opacity - 30%:

One more heart with Opacity - 50%.

Next copy with Opacity - 70%.

Design Valentine’s Day Artwork in Photoshop
Posted by kan9mas on 7:01 AM
Photoshop Tutorial Gratis
1. Create a new document that’s 500×500 pixels. Go to Custom Shape and choose the heart shape. Hold down the shift key and draw the heart shape. Right click and go into Blending Options > Gradient Overlay and put in the following settings:

2. Using the pen tool create a shape like below for the front of the ribbon. Right click into blending into Blending Options and Gradient Overlay. Put in the following settings:

3. Hold down the ctrl key click on the layer thumbnail of the ribbon, create a new layer and fill it with any colour. Go to Select >Modify > & Contract by 6.

4. Right click on the layer and go ito Blending Options & put in the following Gradient Overlay.

5. Next create the curls on the ribbon, go into Blending options on each layer and put in the following Gradient Overlays:

6. Next create the ends of the ribbon, go into Blending options on each layer and put in the following Gradient Overlays:

7. Next go to the heart layer, hold down ctrl and click on the layer thumbnail to highlight the shape, create 2 a new layer. On one layer get a soft edged with black (11% opacity) and create some shadows. Next get a soft edged brushed with a white colour (11% opacity) and create some light highlights.

8. Create a new layer for the background, fill it with white. Right click into Blending Options > Gradient Overlay and put i the following linear Gradient colours: Put all the heart and ribbons layers into a folder & duplicate the folder (by dragging it to the new layer icon). Right click the copied layer and convert it to a Smart Object.
9. Next go to the Custom Shape tool and choose the shape I have circled below. Hold down shift (so it doesn’t go out of shape) draw the shape (in white) in front of the background. Set the opacity to 10%.

10. Go to the duplicated heart & ribbon, right click and go into Blending Options > Ouer Glow and put in the following settings:

11. Create a new layer, get the Polygonal Lasso Tool and draw an upside down triangle shape (this will be a shadow) and fill it black.

12. Now go to Filter > Blur > Gaussian Blur and put in 56.

13. Finally get this paper texture and copy/paste it onto the canvas. Make the opacity to the layer 40%.


1. Create a new document that’s 500×500 pixels. Go to Custom Shape and choose the heart shape. Hold down the shift key and draw the heart shape. Right click and go into Blending Options > Gradient Overlay and put in the following settings:

2. Using the pen tool create a shape like below for the front of the ribbon. Right click into blending into Blending Options and Gradient Overlay. Put in the following settings:

3. Hold down the ctrl key click on the layer thumbnail of the ribbon, create a new layer and fill it with any colour. Go to Select >Modify > & Contract by 6.

4. Right click on the layer and go ito Blending Options & put in the following Gradient Overlay.

5. Next create the curls on the ribbon, go into Blending options on each layer and put in the following Gradient Overlays:

6. Next create the ends of the ribbon, go into Blending options on each layer and put in the following Gradient Overlays:

7. Next go to the heart layer, hold down ctrl and click on the layer thumbnail to highlight the shape, create 2 a new layer. On one layer get a soft edged with black (11% opacity) and create some shadows. Next get a soft edged brushed with a white colour (11% opacity) and create some light highlights.

8. Create a new layer for the background, fill it with white. Right click into Blending Options > Gradient Overlay and put i the following linear Gradient colours: Put all the heart and ribbons layers into a folder & duplicate the folder (by dragging it to the new layer icon). Right click the copied layer and convert it to a Smart Object.
9. Next go to the Custom Shape tool and choose the shape I have circled below. Hold down shift (so it doesn’t go out of shape) draw the shape (in white) in front of the background. Set the opacity to 10%.

10. Go to the duplicated heart & ribbon, right click and go into Blending Options > Ouer Glow and put in the following settings:

11. Create a new layer, get the Polygonal Lasso Tool and draw an upside down triangle shape (this will be a shadow) and fill it black.

12. Now go to Filter > Blur > Gaussian Blur and put in 56.

13. Finally get this paper texture and copy/paste it onto the canvas. Make the opacity to the layer 40%.

Final Result


Tuesday, February 8, 2011
Create the Photo Manipulation “Brightness Tomorrows”
Posted by kan9mas on 1:13 PM
Belajar Photoshop
below.

Now you have to flip the pictures. To do that go to Edit > Transform > Flip Horizontal. Do it with both layers. Add a vector mask to the "Road." You can find the button Add Vector Mask in the Layers palette (F7).
 The good thing about vector masks is that all the steps you do are reversible. If you use the Eraser Tool instead it’s very hard to get back erased parts. But if you use vector masks, then you can always paint with a white color instead of the black, and the hidden parts will appear again.
So as I said, add a vector mask, press B to pull up the Brush Tool, choose a soft, round brush and pick a black color. Start to paint over the areas you want to disappear. After this step, you should have a picture similar to the one below.

 Good thing on the Background Eraser Tool is that you don’t have to mask all the parts of the factory with the Lasso Tool or with the Pen Tool. Set the tool as in the picture below.
 Click carefully on the blue sky. It will disappear, but the factory will stay. You can change Diameter and Tolerance to get a more realistic result. Don’t worry if some parts of the factory will be a little transparent. It will look like some reflection from the sun, but still be very careful.
The more patient you are with the blending, the more realistic the whole manipulation will look. After this step, you should have something like the image below.

Now choose the Background Eraser Tool again and paint over the sky area. One of the good things about this picture is that there is some artificial mist, as we’ll be adding some more in the next steps.
In the stock picture of the factory the whole smoke is not shown. To add it and make it round press S on your keyboard for the Clone Stamp Tool. Press Alt and (still pressing it) choose some area with the smoke. Paint some more smoke to make it nice and rounded as shown.

The factory is fixed, but I think it would be better if the smoke had some more contrast. Let’s add one more Brightness/Contrast Adjustment Layer. Now increase the contrast to the value of +40, then clip the mask again.
We want to affect the smoke only, and not the whole factory. To fix it press B on your keyboard, choose a soft, round brush with a black color, then paint over the vector mask of the factory (not the smoke!). The result of this step should be similar to the image below.

At first we’ll improve the colors. Right-click on the layer "Road" and choose Duplicate Layer. I usually make a backup of the layer if the next step is not reversible and I don’t know if I will like the result later.
Click on the new "Road copy" layer. Go to Image > Adjustments > Match Color… and set the values on the palette as shown below.
 Thanks to Color Match… your picture should look like this one.
 Much better isn’t it? Now we’ll add Omni Light. Go to Filters > Render > Lighting Effects and set it similar to that shown below.
 The result after this step is shown below.

Select a bright yellow color from the manipulation. Create a new layer and start painting fog. Don’t paint it too much – we want just small, light touches. If the mist doesn’t look realistic, then you can lower the Opacity or change the blending mode of the layer to Screen or Lighten.

Now go to Filter > Sharpen > Unsharp Mask… and set the values as shown.

 After this step your picture should be like this one.

We have to change the blending mode of the layer to so we can see something else – not only the flare. To do that change the Blending Mode to Screen. You can also play with the Opacity of the layer if you’re not satisfied with the result, but I didn’t do that in this case.

I feel the women is too dark. We’ll simply fix that by adding a Brightness/Contrast adjustment layer and setting the value of Brightness to +50. Don’t forget to make a Clipping Mask.

 Now press G on your keyboard for the Gradient Tool. Press Alt and with the Eyedropper to select a dark color from the picture. Fill the mask of woman with this color. Go to Edit > Transform > Flip Vertical. Very well!
Now go to Edit > Transform > Rotate and change the rotation of the picture so it has the same direction as the lighting. Then press Command + T and change size of the shadow. Do it larger and little bit wider.
 The shadow is too hard at this point. To fix it go to Filter > Blur > Gaussian Blur…and set the value Radius on about 3,5 px. The result of this step should be similar to the image below.

First we’ll modify the color balance. Add a new Adjustment Layer Color Balance on the top of the other layers, and set the values like on this picture below.
 Add a Photo Filter Adjustment Layer and set it as shown.
 Very well, we are almost done. At this stage your image should be similar to this one.

Create a new Levels adjustment layer at the top of the layers. Set the Input Levels to: 0; 0,85; 255. Press G (Gradient Tool) on your keyboard and fill the vector mask of the adjustment layer with black, and the adjustment disappears.
Now choose a soft, round brush, pick white for the color, and paint around the edges (still on the vector mask) of your picture. It will make the edges darker.
In this last step we’ll add texture which will increase the contrast of manipulation a little more. Open the grunge texture you downloaded earlier and drag it into the manipulation. Now change the blending mode to Color Burn and lower the Opacity to about 10%.


below.

Tutorial Details
- Program: Photoshop CS2
- Difficulty: Advanced
- Estimated Completion Time: 3-4 hrs
Preparation
Before we start let’s download all the pictures we will need: road, bigger factory, smaller factory, woman, mist brushes and texture. The picture of sky is not available for downloading but you can use any sunset you find.Step 1 – Blending the Background
Open the picture of the road and of the sky you’ve chosen, then drag them into the new document. Name the layers "Road" and "Sky." The layer "Road" should be above the "Sky" layer.Now you have to flip the pictures. To do that go to Edit > Transform > Flip Horizontal. Do it with both layers. Add a vector mask to the "Road." You can find the button Add Vector Mask in the Layers palette (F7).

So as I said, add a vector mask, press B to pull up the Brush Tool, choose a soft, round brush and pick a black color. Start to paint over the areas you want to disappear. After this step, you should have a picture similar to the one below.

Step 2 – Adding the Bigger Factory
Open the picture with the bigger factory and drag it into the manipulation. Call the layer "Bigger Factory" and place it above the "Sky" and "Road" layers. Flip the picture as you did with the previous layers. Now we have to remove the blue sky. Use the Background Eraser Tool to do this.

The more patient you are with the blending, the more realistic the whole manipulation will look. After this step, you should have something like the image below.

Step 3 – Adding the Smaller Factory
Open the picture of the smaller factory, drag it into the manipulation, flip it, then name the layer "Smaller Factory." Place it on the top of the layers.Now choose the Background Eraser Tool again and paint over the sky area. One of the good things about this picture is that there is some artificial mist, as we’ll be adding some more in the next steps.
In the stock picture of the factory the whole smoke is not shown. To add it and make it round press S on your keyboard for the Clone Stamp Tool. Press Alt and (still pressing it) choose some area with the smoke. Paint some more smoke to make it nice and rounded as shown.

Step 4 – Blending the Factory
As you can see the factory is too dark. To fix that add a Brightness/Contrast Adjustment Layer and lower the contrast to about -20. Click directly on the adjustment layer and create a clipping mask from it. Thanks to the clipping mask, the adjustment layer affects only the "Smaller Factory" layer.The factory is fixed, but I think it would be better if the smoke had some more contrast. Let’s add one more Brightness/Contrast Adjustment Layer. Now increase the contrast to the value of +40, then clip the mask again.
We want to affect the smoke only, and not the whole factory. To fix it press B on your keyboard, choose a soft, round brush with a black color, then paint over the vector mask of the factory (not the smoke!). The result of this step should be similar to the image below.

Step 5 – Fixing the Road
If you take a look at the previous picture, you can see that the road is too dark, it has the wrong lighting, and also the colors don’t fit. All these problems will be fixed in this step though.At first we’ll improve the colors. Right-click on the layer "Road" and choose Duplicate Layer. I usually make a backup of the layer if the next step is not reversible and I don’t know if I will like the result later.
Click on the new "Road copy" layer. Go to Image > Adjustments > Match Color… and set the values on the palette as shown below.


Step 6 – Adding Mist
To create a more dreamy atmosphere we’ll add mist. Add the mist brushes you downloaded. If you don’t know how to add brushes into the Photoshop, then review this tutorial.Select a bright yellow color from the manipulation. Create a new layer and start painting fog. Don’t paint it too much – we want just small, light touches. If the mist doesn’t look realistic, then you can lower the Opacity or change the blending mode of the layer to Screen or Lighten.

Step 7 – Sharpening
In this step, we’ll make the picture more sharp. Press M for the Rectangular Marquee Tool, then select the whole image. Got to Edit > Copy Merged, and then Edit > Paste. It will paste the merged image with all the visible layers.Now go to Filter > Sharpen > Unsharp Mask… and set the values as shown.

Step 8 – Color Adjustment
Now it’s time for the first color adjustment. We’ll add more violet colors to create a bit of a futuristic or unrealistic look. Add a Color Balance Adjustment Layer on the top of the layers, then set it as shown below.

Step 9 – Adding Lens Flare
To light the picture and give it a bit more contrast we’ll add a lens flare. Create a new layer on top of the other layers, name it "Lens Flare" and fill it with a solid, black color. Go to Filter > Render > Lens Flare…and select the one you like. I used the first one, which is 50-300mm Zoom. Now press OK.We have to change the blending mode of the layer to so we can see something else – not only the flare. To do that change the Blending Mode to Screen. You can also play with the Opacity of the layer if you’re not satisfied with the result, but I didn’t do that in this case.

Step 10 – Adding the Female Character
It’s time to add the woman. Open the picture with her, cut her out and drag her into the manipulation. Call the layer "Woman" and place the image on top of the layers. Change the size of the picture and place it in the horizon.I feel the women is too dark. We’ll simply fix that by adding a Brightness/Contrast adjustment layer and setting the value of Brightness to +50. Don’t forget to make a Clipping Mask.

Step 11 – Adding Shadows
According to the lighting of this manipulation, the woman should have a long, soft shadow in front of her. To add it, right-click on the women and select Duplicate Layer, then name the layer "Shadow." Press Command and click on the Layer thumbnail. It will activate the mask of the layer.
Now go to Edit > Transform > Rotate and change the rotation of the picture so it has the same direction as the lighting. Then press Command + T and change size of the shadow. Do it larger and little bit wider.


Step 12 – Changing Colors
I think that the colors should me richer than they are now. In this step we will change the Color Balance once again and add a Photo Filter.First we’ll modify the color balance. Add a new Adjustment Layer Color Balance on the top of the other layers, and set the values like on this picture below.


Step 13 – Vignette & Texture
I like vignette because it’s an easy way to border the picture and jail the viewer’s look a little longer in the manipulation. So let’s add it!Create a new Levels adjustment layer at the top of the layers. Set the Input Levels to: 0; 0,85; 255. Press G (Gradient Tool) on your keyboard and fill the vector mask of the adjustment layer with black, and the adjustment disappears.
Now choose a soft, round brush, pick white for the color, and paint around the edges (still on the vector mask) of your picture. It will make the edges darker.
In this last step we’ll add texture which will increase the contrast of manipulation a little more. Open the grunge texture you downloaded earlier and drag it into the manipulation. Now change the blending mode to Color Burn and lower the Opacity to about 10%.

Conclusion
Congratulation you’ve finished! I really hope that this tutorial was useful to you, and that you’ve learned some new techniques, or found inspiration for your work. You can see the final result below.
